

Cluster Deployment Overview
The main concept of clustered Webswing is to divide the former Webswing Server into separate modules which handle web requests (Webswing Cluster Server) and application processing (Webswing Session Pool). In addition Admin console with its REST interface has been extracted into Admin Console Server module. With this setup you are able to deploy one Webswing cluster, handling multiple applications with:
- 1 .. N Webswing Cluster Servers
- 1 .. N Webswing Session Pools
- 0 .. 1 Webswing Admin Console Server
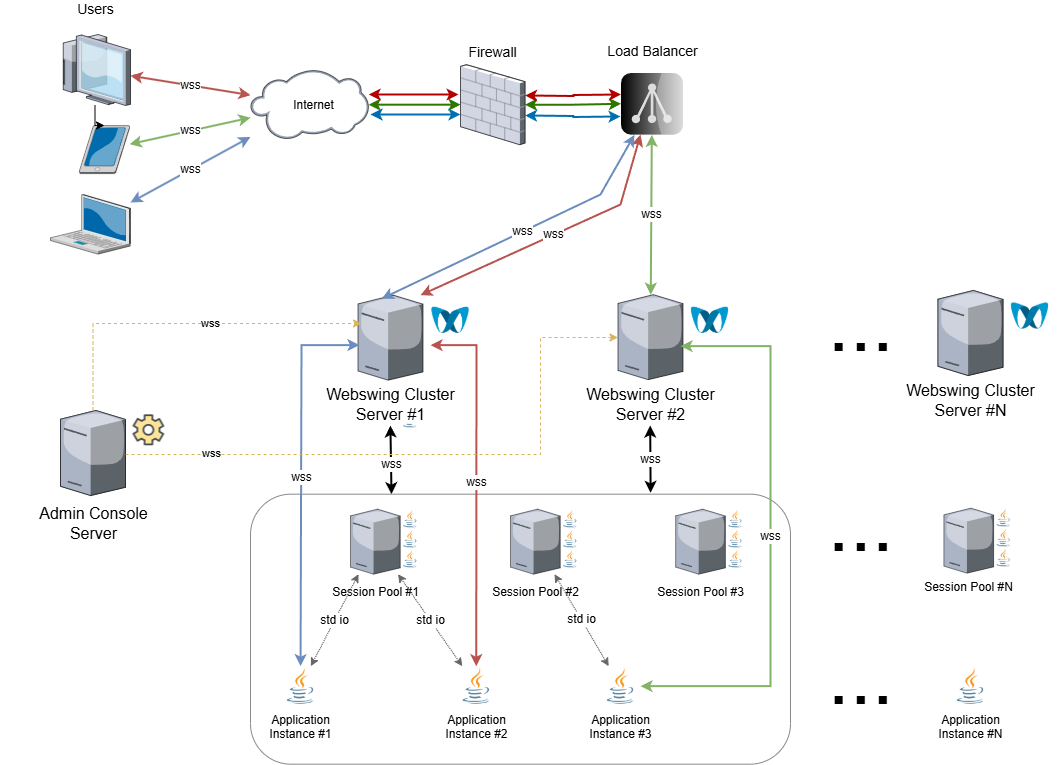
In a minimal setup you need 1 Cluster Server and 1 Session Pool. You can use multiple Cluster Servers for redundancy, but it should not be necessary to have more than 2 Cluster Servers in most cases. Session Pools can be scaled dynamically, depending on your needs of resources or connected users. Note that it is not possible to connect more than 1 Admin Console Server in the cluster.
You can deploy your cluster manually in a static way or you can use Docker images and Kubernetes with custom auto-scaling. For more information about Docker and Kubernetes deployment please contact support@webswing.org. Since 23.1 Webswing Cluster includes an Auto-scaling service.
Installation
To install Webswing Cluster first unzip the distribution zip file. In the folder you will find webswing.war archive, which is used to start both Cluster Server and Session Pool. There is a separate startup script for each module. To simplify your deployment, you can make a copy of the unzipped distribution folder for each module (Cluster Server or Session Pool) you want to deploy and start the module accordingly, using webswing.sh/webswing.bat for Cluster Server or sessionpool.sh/sessionpool.bat for Session Pool.
The Session Pool includes built-in XHeadless, so headless Linux hosts can run Webswing applications without a separate Xvfb service. Cluster Server does not need a display.
It is highly recommended that you do not share the configuration files between multiple modules. Every Cluster Server and every Session Pool should at least have its own *.config file. If you plan to have multiple Cluster Servers or Session Pools, create a separate installation folder for each of them. Also consider using Docker images which can easily contain your single module deployments.
Migration of webswing.config
When Cluster Server starts without webswing-server.config and finds webswing.config, it creates webswing-server.config beside the source file. When Session Pool starts without webswing-app.config and finds webswing.config, it creates webswing-app.config beside the source file. Referenced drop-in configurations are converted in the same way, including when the root cluster configuration already exists. The source files and any existing cluster configuration are left unchanged.
A packaged drop-in can be installed by copying its flat ZIP into the cluster home's apps directory (or the directory selected by webswing.dropin.dir). The ZIP must contain webswing.config at its root with a single-segment application path. Each Cluster role extracts the package into the path-derived application folder, creates only its applicable split configuration, and registers the application once in its root configuration. The combined webswing.config is not extracted into a Cluster application folder. Removing the reference through the Admin Console or directly from a role's root configuration unregisters the application for that role without deleting its ZIP or extracted files, and automatic deployment does not restore the reference. Configure the same drop-in directory for Cluster Server and Session Pool; set webswing.dropin.autodeploy.enabled=false in both properties files to disable automatic installation.
The following steps describe manual migration.
Rename webswing.config to webswing-server.config and create new empty webswing-app.config file.
In webswing-app.config file create the structure of application paths like in this example:
{
    "/webswing-demo": {

    },
    "/javafx": {

    }
}
Now cut content from webswing-server.config from "swingConfig":
{
    "/webswing-demo": {
        "swingConfig": {
            <cut this>
        }
    }
}
and paste into the created structure in webswing-app.config:
{
    "/webswing-demo": {
        <paste here>
    }
}
Note that in webswing-app.config you do not provide any configuration for root path "/".
After you have cut and pasted all your application configurations into webswing-app.config, you can remove empty "swingConfig" fields from webswing-server.config. The configuration that is left in this file is your webswing-server.config.